Afficher/cacher Sommaire
Markdown est un langage de balisage qui se veut être facile à lire par les personnes. Les balises ne doivent pas être abstraites, mais proches de leur véritable signification.
Markdown
Entête de fichier markdown pour serveur statique jekyll
---
layout: article
title:  tmux
toc: true
create: 2020-08-03
modif: 2019-03-06
tags: [tmux,divers]
mathjax: (falcutatif)
mermaid: (falcutatif)
chart: (falcutatif)
---
- layout : toujours post (Obligatoire)
- title : le titre du billet (Obligatoire)
- toc : true pour avoir un menu de lien des différentes entêtes du billet
- date : respecter le format aaaa-mm-jj (Obligatoire)
- categories et tags : un mot entre crochets sans espace ni caractères spéciaux , si plusieurs une virgule pour les séparer
Icônes Forkawesome
<i class="fa fa-car"></i> <i class="fa fa-cubes"></i>
<i class="fa fa-car" style="font-size:48px;"></i>
<i class="fa fa-car" style="font-size:60px;color:red;"></i>
Ajout fa-fw pour afficher:
<i class="fa fa-fw fa-database"> <i class="fa fa-fw fa-server"></i>
Désactiver les balises liquid
Il est possible de désactiver les balises liquid en utilisant raw / endraw
Exemple

Etendre Réduire un contenu
Etendre Réduire
Lorem ipsum dolor sit amet, consectetur adipiscing elit. Sed quam augue, volutpat a vehicula in, elementum ac nibh. Duis gravida sodales lobortis.
Nullam venenatis nec mauris ac cursus. Duis tempor volutpat sapien vel molestie. Fusce velit ante, volutpat vitae dui tincidunt, pharetra pulvinar magna.
Pellentesque tincidunt scelerisque sapien, sit amet semper risus dignissim at. Quisque laoreet gravida metus, pharetra egestas urna ultricies eget.
Integer eu lobortis dolor. Donec sollicitudin pulvinar quam, ac tempus lectus convallis ut. Sed ut mollis mi, vel tempor ex.
In quis purus porta, fermentum libero a, luctus nulla. Nulla eget risus scelerisque, maximus sem a, accumsan ante.
Praesent consequat sed odio ac commodo. Maecenas sit amet dictum lorem.
Nullam libero augue, suscipit vitae fermentum aliquet, malesuada at arcu.
Syntaxe
<details>
<summary><b>Etendre Réduire</b></summary>
{% highlight text %}
{% endhighlight %}
</details>
Syntaxe
Fichiers
Les fichiers sont dans le dossier /files
[Fichier téléchargeable](/files/nomFichier)
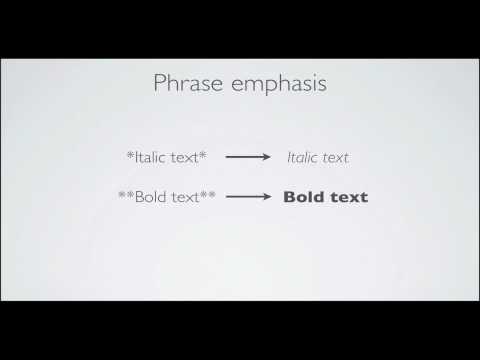
Gras et italique
Écrire en gras et en italique est particulièrement facile avec Markdown. Il suffit d’utiliser les étoiles, appelées aussi astérisques. Pour écrire en italique, insérez tout simplement une étoile devant et derrière l’expression le mot ou concerné. Pour le gras, insérez deux étoiles avant et après. Pour le gras et l’italique, vous devrez opter pour trois étoiles. Une autre option consiste à utiliser les tirets bas.
*Texte en italique*
_Texte en italique_
**Texte en gras**
__Texte en gras__
***Texte en italique et en gras***
___Texte en italique et en gras___
Texte en italique
Texte en italique
Texte en gras
Texte en gras
Texte en italique et en gras
Texte en italique et en gras
Barré
Pour barrer un texte avec Markdown, précédez-le de <s> et refermez la chaîne avec </s>.
<s>Ce texte est barré</s>.mais pas celui-là.
.mais pas celui-là.
Listes
(Dans cet exemple, des espaces de tête et de sentier sont montrés avec des points:: ⋅)
1. Première liste commandée
2. Autre question
...* Sous-liste non ordonnée.
1. Les chiffres réels n'ont pas d'importance, juste que c'est un nombre
....1 Sous-liste commandée
4. Et un autre article.

⋅⋅ Vous pouvez avoir correctement identifié des paragraphes dans les éléments de la liste. Notez la ligne blanche ci-dessus, et les principaux espaces (au moins un, mais nous utiliserons trois ici pour aligner également la marque brute).

⋅⋅ Pour avoir une rupture de ligne sans un paragraphe, vous aurez besoin d'utiliser deux espaces traînants.
⋅⋅ Notez que cette ligne est séparée, mais dans le même paragraphe.⋅⋅

* Liste non ordonnée peut utiliser des astérisques
- Ou minuses
+ Ou plus.
- Première liste commandée
- Autre question
- Sous-liste non ordonnée..
- Les chiffres réels n’ont pas d’importance, juste que c’est un nombre
- Sous-liste commandée
-
Et un autre article.
Vous pouvez avoir correctement identifié des paragraphes dans les éléments de la liste. Notez la ligne blanche ci-dessus, et les principaux espaces (au moins un, mais nous utiliserons trois ici pour aligner également la marque brute).
Pour avoir une pause de ligne sans un paragraphe, vous devrez utiliser **deux espaces de sentier**. Notez que cette ligne est séparée, mais dans le même paragraphe.
- Liste non ordonnée peut utiliser des astérisques
- Ou moins
-
Ou plus
- List 0
- List
- Hello!
Case à cocher
Markdown permet aussi d’éditer des listes à cocher. Ces listes sont précédées d’une case à cocher pouvant être activée par clic. Ces cases peuvent d’ailleurs être cochées par défaut au moment de la création de la liste. Pour ce faire, vous devez utiliser les crochets et le X.
- [x] Task one is done.
- [ ] Task two is undergoing.
- [ ] Stay awesome!
- Task one is done.
- Task two is undergoing.
- Stay awesome!
Marques , sub et sup
Je dois souligner ces <mark>mots très importants</mark>.
Je dois souligner ces mots très importants.
H<sub>2</sub>O
X<sup>2</sup>
H2O
X2
Liens
Markdown permet aussi d’insérer des images et des hyperliens dans votre texte. Cette insertion se fait en combinant des parenthèses et des crochets. Pour créer un lien, vous devrez écrire les mots ou les phrases visibles dans le texte entre crochets, suivis directement de l’adresse URL entre parenthèses. Si vous souhaitez ajouter au lien un titre facultatif, visible par l’utilisateur au survol de la souris, c’est tout à fait possible : ce texte devra être ajouté à l’adresse URL entre les parenthèses, mais sera séparé d’une espace de l’URL, et inscrit entre guillemets doubles.
Ici ce qui suit [Lien](https://example.com/ "titre de lien optionnel").
Ici ce qui suit Lien.
Si vous insérez une adresse URL ou une adresse électronique dans votre texte ordinaire, la plupart des éditeurs Markdown créeront automatiquement un hyperlien accessible par clic. Pour forcer cette fonction, utilisez les signes inférieur et supérieur à. Si, en revanche, vous souhaitez empêcher les éditeurs d’activer cette fonction, marquez l’URL comme code, et utilisez à nouveau les apostrophes inversées.
<https://example.com>
`https://example.com`
https://example.com
https://example.com
notes de bas de page
Markdown vous permet aussi d’éditer des notes de bas de page. Ajoutez tout simplement dans votre texte un numéro d’annotation, et reprenez ce numéro en bas de votre page dans une note de bas de page. Markdown créera alors automatiquement une ligne. Le chiffre correspondant à l’annotation est automatiquement formaté en lien, ce qui vous permet d’atteindre la note de bas de page par un simple clic. Pour pouvoir bénéficier de cet automatisme, commencez par inscrire le numéro de l’annotation derrière le mot souhaité : commencez par écrire un accent circonflexe entre les crochets, suivi du numéro.
Le choix du chiffre (ou autres valeurs) n’a aucune espèce d’importance. Comme pour la création de liste, Markdown se charge de la numérotation. Ce qui est important, c’est de créer ensuite un renvoi vers la désignation que vous aurez sélectionnée. Pour ce faire, vous devez reprendre le même chiffre dans une nouvelle ligne, inséré à nouveau entre crochets avec un accent circonflexe, vous ajoutez le signe des deux points, et vous rédigez le texte de l’annotation. Ce texte pourra d’ailleurs faire l’objet d’un formatage de votre choix, et s’étendre sur plusieurs lignes.
Dans le texte ordinaire [^1] vous pouvez facilement placer des notes de bas de page [^2]
[^1]: Vous trouverez ici le texte de la note de bas de page.
 [^2]: **Note de page de page** peut aussi être *formatée*.
Et celles-ci comprennent même plusieurs lignes
Dans le texte ordinaire [^1] vous pouvez facilement placer des notes de bas de page [^2]
[^1]: Vous trouverez ici le texte de la note de bas de page.
[^2]: Note de page de page peut aussi être formatée.
Et celles-ci comprennent même plusieurs lignes
Echappatoires et HTML
En plus des caractères spéciaux imposés par HTML, Markdown utilise quelques autres caractères pour le formatage. Si l’on insère ces caractères, l’analyseur syntaxique en tiendra compte au moment de la conversion. Voici les caractères concernés :
- Astérisque :
* - Trait d’union :
- - Souligné :
_ - Parenthèses :
() - Crochets :
[] - Accolades :
{} - Point :
. - Point d’exclamation :
! - Dièse :
# - Accent grave : `
- Barre oblique inversée :
\
Si l’on veut utiliser ces caractères dans leur sens premier, il suffit de les précéder d’une barre oblique inversée. Important : Cette barre oblique inversée doit impérativement précéder chacun de ces caractères. Cela concerne donc autant une parenthèse ouvrante qu’une parenthèse fermante.
Que faire si l’on veut seulement afficher les astérisques, et non les italiques ?
- ceci apparaît en italique : un jour heureux
- ceci n’apparaît pas en italique : *un jour heureux*
Markdown :
* ceci apparaît en italique : *un jour heureux*
* ceci n'apparaît pas en italique : \*un jour heureux\*
Les barres obliques inversées disparaîtront et laisseront place aux astérisques. Vous pouvez faire la même chose avec n’importe quel caractère ayant une signification spéciale pour Markdown.
De nombreuses balises HTML simples sont autorisées, par exemple <b>
Les balises inconnues seront supprimées. Pour afficher un <b> littéral ou une balise inconnue comme <foobar>, vous devez l’échapper avec des entités HTML :
<b>ce sera en gras</b>
vous devez échapper aux balises <inconnues>
© special entities work
&copy; if you want to escape it
Sortie:
ce sera en gras
vous devez échapper aux balises <inconnues>
© les entités spéciales fonctionnent
© si vous voulez y échapper
HTML tags that are block-level like <div> can be used, but if there is markdown formatting within it, you must add a “markdown” attribute: <div markdown> Some safe attributes are also allowed, permitting basic styling and layout: <div markdown style="float:left">
Individual ampersands (&) and less-than signs (<) are fine, they will be shown as expected.
Les balises HTML au niveau du bloc, comme <div>, peuvent être utilisées, mais si elles contiennent un formatage markdown, vous devez ajouter un attribut “markdown” : <div markdown>
Certains attributs sûrs sont également autorisés, permettant un style et une mise en page de base : <div markdown style="float:left">
Les esperluettes (&) et les signes moins que (<) sont acceptables, ils seront affichés comme prévu.
| un | deux | trois |
|---|---|---|
| Foo1 | Foo2 | Foo3 |
Code et Syntaxe Highlighting
Pour écrire un morceau de code dans un texte, Markdown l’identifie au moyen du caractère appelé le Backtick ou apostrophe inversée. Attention, à ne pas confondre avec les guillemets. Le marquage est donc constitué d’une apostrophe inversée au début et à la fin du segment correspondant au code. C’est ainsi que vous pourrez incorporer directement le code source ou une commande logicielle dans le texte.
Le `code` en ligne est entouré de `back-ticks`.
Le code en ligne est entouré de back-ticks.
Les blocs de code sont soit délimités par des lignes comportant trois crochets, soit indentés de quatre espaces. Je recommande de n’utiliser que les blocs de code clôturés : ils sont plus faciles à utiliser et sont les seuls à prendre en charge la coloration syntaxique.
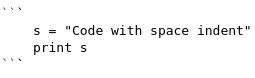
	s = "Code with space indent"
	print s
highlighting codes
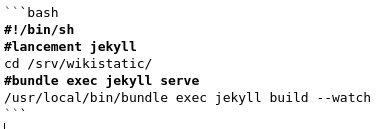
#!/bin/sh
#lancement jekyll
cd /srv/wikistatic/
#bundle exec jekyll serve
/usr/local/bin/bundle exec jekyll build --watch
Exemples de code
bash
#/bin/bash
fichierindex="indexA.html"
echo '<!doctype html>
<html lang="fr">
<head>
    <meta charset="UTF-8">
    <title>Fichiers html</title>
</head>
<body>
 <ul>' > $fichierindex
OIFS=$IFS
IFS=$'\n'
  for file in $(find /home/yannick/Documents/html/ -name "*.html")
    do
       lien=$(basename ${file%.*})
       echo '<li><a href="'$lien'.html">'$lien'</a></li>' >> $fichierindex
    done
IFS=$OIFS
echo '
 </ul>
</body>
</html>' >> $fichierindex
Entre deux ` ` (altgr 7)
entre deux altgr 7
python
#!/usr/bin/env python
import os
from gi.repository import Gtk
from gi.repository import AppIndicator3

class AppIndicatorExample:
    def __init__(self, indicator_id):
        self.ind = AppIndicator3.Indicator.new(str(indicator_id), os.path.abspath('sample_icon.svg'), AppIndicator3.IndicatorCategory.SYSTEM_SERVICES)
        self.ind.set_status(AppIndicator3.IndicatorStatus.ACTIVE)

        # create a menu
        self.menu = Gtk.Menu()

        item = Gtk.MenuItem(str(indicator_id))
        item.show()
        self.menu.append(item)

        image = Gtk.ImageMenuItem(Gtk.STOCK_QUIT)
        self.menu.append(image)

        self.menu.show()

        self.ind.set_menu(self.menu)

    def quit(self, widget, data=None):
        Gtk.main_quit()

if __name__ == "__main__":
    indicator = AppIndicatorExample(1)
    Gtk.main()
perl
#!/usr/bin/perl -w

use strict;
use warnings;

use constant VERSION => 0.03;

if(scalar @ARGV != 4) {
   &help;
}

my $image_web;
my $dimensions;

# Détermination des arguments
for(my $i = 0; $i < scalar @ARGV; $i +=2) {
   if($ARGV[$i] eq "-s") {
      $dimensions = $ARGV[$i + 1];
   }
   elsif($ARGV[$i] eq "-i") {
      $image_web = $ARGV[$i + 1];
   }
   else {
      print STDERR "Argument $ARGV[$i] inconnu\n";
      &help;
   }
}
javascript
 function init() {
    /* Sidebar height set */
    $sidebarStyles = $('.sidebar').attr('style')
    $sidebarStyles += ' min-height: ' + $(document).height() + 'px;';
    $('.sidebar').attr('style', $sidebarStyles);

    /* Secondary contact links */
    var $scontacts = $('#contact-list-secondary');
    var $contactList = $('#contact-list');

    $scontacts.hide();
    $contactList.mouseenter(function(){ $scontacts.fadeIn(); });
    $contactList.mouseleave(function(){ $scontacts.fadeOut(); });

    /**
     * Tags & categories tab activation based on hash value. If hash is undefined then first tab is activated.
     */
    function activateTab() {
      if(['/tags.html', '/categories.html'].indexOf(window.location.pathname) > -1) {
        var hash = window.location.hash;
        if(hash)
          $('.tab-pane').length && $('a[href="' + hash + '"]').tab('show');
        else
          $('.tab-pane').length && $($('.cat-tag-menu li a')[0]).tab('show');
      }
    }

    // watch hash change and activate relevant tab
    $(window).on('hashchange', activateTab);

    // initial activation
    activateTab();
  };
Liste des formats du bloc de code Markdown
Les langues prises en charge dépendent fortement de l’analyseur Markdown que vous utilisez. Ce qui suit est une liste de plusieurs langues et formats courants que vous pouvez essayer. Si votre langue ne figure pas dans cette liste, je vous suggère d’essayer simplement si elle est supportée. Vous pouvez également consulter la documentation de votre langage Markdown spécifique.
    actionscript3
    apache
    applescript
    asp
    brainfuck
    c
    cfm
    clojure
    cmake
    coffee-script, coffeescript, coffee
    cpp – C++
    cs
    csharp
    css
    csv
    bash
    diff
    elixir
    erb – HTML + Embedded Ruby
    go
    haml
    http
    java
    javascript
    json
    jsx
    less
    lolcode
    make – Makefile
    markdown
    matlab
    nginx
    objectivec
    pascal
    PHP
    Perl
    python
    profile – python profiler output
    rust
    salt, saltstate – Salt
    shell, sh, zsh, bash – Shell scripting
    scss
    sql
    svg
    swift
    rb, jruby, ruby – Ruby
    smalltalk
    vim, viml – Vim Script
    volt
    vhdl
    vue
    xml – XML and also used for HTML with inline CSS and Javascript
    yaml
Tableaux
Pour créer un tableau vous devez placer une ligne de tirets (-) sous la ligne d’entête et séparer les colonnes avec des |.
Vous pouvez aussi préciser l’alignement en utilisant des :. :
| Aligné à gauche  | Centré          | Aligné à droite |
| :--------------- |:---------------:| -----:|
| Aligné à gauche  |   ce texte        |  Aligné à droite |
| Aligné à gauche  | est             |   Aligné à droite |
| Aligné à gauche  | centré          |    Aligné à droite |

Markdown | Less | Pretty
--- | --- | ---
*Still* | `renders` | **nicely**
1 | 2 | 3
| Aligné à gauche | Centré | Aligné à droite |
|---|---|---|
| Aligné à gauche | ce texte | Aligné à droite |
| Aligné à gauche | est | Aligné à droite |
| Aligné à gauche | centré | Aligné à droite |
| Markdown | Less | Pretty |
|---|---|---|
| Still | renders |
nicely |
| 1 | 2 | 3 |
Repli texte - Citations
> Le repli texte à l'aide de `>`  est très pratique dans les courriels pour émuler un texte de réponse.
> Cette ligne fait partie de la même citation.

Saut de citation.

> Il s'agit d'une très longue ligne qui sera toujours citée correctement lorsqu'elle sera enveloppée. Oh, continuons à écrire pour nous assurer que la ligne est assez longue pour que tout le monde puisse la lire. Oh, vous pouvez *mettre* **Markdown** dans un blockquote.
Le repli texte à l’aide de
>est très pratique dans les courriels pour émuler un texte de réponse. Cette ligne fait partie de la même citation.
Saut de citation.
Il s’agit d’une très longue ligne qui sera toujours citée correctement lorsqu’elle sera enveloppée. Oh, continuons à écrire pour nous assurer que la ligne est assez longue pour que tout le monde puisse la lire. Oh, vous pouvez mettre Markdown dans un blockquote.
Ligne Horizontale
Trois ou plus...

---

Traits d'union

***

Astérisques

___

Soulignés
Trois ou plus…
Traits d’union
Astérisques
Soulignés
Ligne Breaks
Voici une ligne pour commencer.

Cette ligne est séparée de la précédente par deux nouvelles lignes, ce qui en fait un *paragraphe séparé*.

Cette ligne commence également un paragraphe séparé, mais...
Cette ligne n'est séparée que par deux espaces et une seule nouvelle ligne, c'est une ligne distincte dans le *même paragraphe*.
Voici une ligne pour commencer.
Cette ligne est séparée de la précédente par deux nouvelles lignes, ce qui en fait un paragraphe séparé.
Cette ligne commence également un paragraphe séparé, mais…
Cette ligne n’est séparée que par deux espaces et une seule nouvelle ligne, il s’agit donc d’une ligne distincte dans le même paragraphe.
Titres
Par défaut, pour rédiger un titre avec Markdown, on utilise le dièse. On le sépare du texte avec une espace. Pour créer des sous-titres de hiérarchie inférieure, et donc rédigés en plus petits, il suffit d’insérer des dièses supplémentaires. Comme pour l’édition HTML, vous pourrez créer jusque 6 niveaux de sous-titres.
# H1
## H2
### H3
#### H4
##### H5
###### H6

Alternatively, for H1 and H2, an underline-ish style:

Alt-H1
======

Alt-H2
------
Graphes
MathJax
Ajouter au Front matter mathjax: true
When $$a \ne 0$$, there are two solutions to $$ax^2 + bx + c = 0$$
and they are

$$x_1 = {-b + \sqrt{b^2-4ac} \over 2a}$$

$$x_2 = {-b - \sqrt{b^2-4ac} \over 2a} \notag$$
When \(a \ne 0\), there are two solutions to \(ax^2 + bx + c = 0\) and they are
\[x_1 = {-b + \sqrt{b^2-4ac} \over 2a}\] \[x_2 = {-b - \sqrt{b^2-4ac} \over 2a} \notag\]Mermaid
Ajouter au Front matter mermaid: true
graph LR
    A --- B
    B-->C[Happy]
    B-->D(Sad);
Markdown
    ```mermaid
        graph LR
        A --- B
        B-->C[Happy]
        B-->D(Sad);
    ```
Autre exemple
graph TD
  B[peace]
  B-->C[fa:fa-ban forbidden]
  B-->D(fa:fa-spinner);
  B-->E(fa:fa-camera-retro perhaps?);
Chart
ajouter au Front matter chart: true
Line Chart
{
  "type": "line",
  "data": {
    "labels": [
      "January",
      "February",
      "March",
      "April",
      "May",
      "June",
      "July"
    ],
    "datasets": [
      {
        "label": "# of bugs",
        "fill": false,
        "lineTension": 0.1,
        "backgroundColor": "rgba(75,192,192,0.4)",
        "borderColor": "rgba(75,192,192,1)",
        "borderCapStyle": "butt",
        "borderDash": [],
        "borderDashOffset": 0,
        "borderJoinStyle": "miter",
        "pointBorderColor": "rgba(75,192,192,1)",
        "pointBackgroundColor": "#fff",
        "pointBorderWidth": 1,
        "pointHoverRadius": 5,
        "pointHoverBackgroundColor": "rgba(75,192,192,1)",
        "pointHoverBorderColor": "rgba(220,220,220,1)",
        "pointHoverBorderWidth": 2,
        "pointRadius": 1,
        "pointHitRadius": 10,
        "data": [
          65,
          59,
          80,
          81,
          56,
          55,
          40
        ],
        "spanGaps": false
      }
    ]
  },
  "options": {}
}
markdown:
```chart
{
  "type": "polarArea",
  "data": {
    "datasets": [
      {
        "data": [
          11,
          16,
          7,
          3,
          14
        ],
        "backgroundColor": [
          "#FF6384",
          "#4BC0C0",
          "#FFCE56",
          "#E7E9ED",
          "#36A2EB"
        ],
        "label": "My dataset"
      }
    ],
    "labels": [
      "Red",
      "Green",
      "Yellow",
      "Grey",
      "Blue"
    ]
  },
  "options": {}
}
```
Pie chart
{
    "type": "pie",
    "data": {
        "labels": ["Red", "Blue", "Yellow", "Green", "Purple", "Orange"],
        "datasets": [{
            "label": "Votes",
            "data": [12, 19, 3, 5, 2, 3],
            "backgroundColor": [
                "rgba(255, 99, 132, 0.2)",
                "rgba(54, 162, 235, 0.2)",
                "rgba(255, 206, 86, 0.2)",
                "rgba(75, 192, 192, 0.2)",
                "rgba(153, 102, 255, 0.2)",
                "rgba(255, 159, 64, 0.2)"
            ],
            "borderColor": [
                "rgba(255, 99, 132, 1)",
                "rgba(54, 162, 235, 1)",
                "rgba(255, 206, 86, 1)",
                "rgba(75, 192, 192, 1)",
                "rgba(153, 102, 255, 1)",
                "rgba(255, 159, 64, 1)"
            ],
            "borderWidth": 1
        }]
    },
    "options": {}
}
Vidéos
Youtube
Youtube (markdown)
On affiche la première image de la vidéo , un clic permet la lecture sur le site youtube
Syntaxe dans le “post”
[](https://www.youtube.com/watch?v=YOUTUBE_VIDEO_ID_HERE "Video Title")
Exemple vidéo youtube : Markdown tutorial
[](https://www.youtube.com/watch?v=6A5EpqqDOdk "Markdown tutorial")

Youtube (iframe)
<iframe width="640" height="480" src="https://www.youtube.com/embed/wbY97-hdD5c?rel=0&showinfo=0" frameborder="0" scrolling="no" allowfullscreen=""></iframe>
Iframe
Syntaxe directe (iframe)
<iframe src="https://player.vimeo.com/video/193567768?title=0&byline=0&portrait=0" autostart="false" width="640" height="360" frameborder="0" ></iframe>
Video
HTML brut (video)
Vous pouvez toujours écrire du HTML brut dans votre document “de balisage”markdown” :
<video width="640" height="480" controls>
  <source src="/files/k-9mail01.mp4" type="video/mp4">
</video>
Ted
<iframe width="640" height="480" src="https://embed.ted.com/talks/emily_esfahani_smith_there_s_more_to_life_than_being_happy" frameborder="0" scrolling="no" allowfullscreen="">
</iframe>
Soundcloud
<div>
<iframe class="extensions extensions--audio" width="100%" height="166" src="https://w.soundcloud.com/player/?url=https%3A//api.soundcloud.com/tracks/313627932&color=%23ff5500&auto_play=false&hide_related=false&show_comments=true&show_user=true&show_reposts=false&show_teaser=true" scrolling="no" frameborder="no" allow="autoplay">
</iframe>
</div>
codepen
Alerte et Tag
Alerte
Success Text.
Info Text.
Warning Text.
Error Text.
markdown:
Success Text.
{:.success}
Info Text.
{:.info}
Warning Text.
{:.warning}
Error Text.
{:.error}
Tag
success
info
warning
error
markdown:
`success`{:.success}
`info`{:.info}
`warning`{:.warning}
`error`{:.error}
Boutons
| Type | Class Names |
|---|---|
| base | button |
| type | button--primary, button--secondary, button--success, button--info, button--warning, button--error, button--outline-primary, button--outline-secondary, button--outline-success, button--outline-info, button--outline-warning, button--outline-error |
| shape | button--pill, button--rounded, button--circle |
| size | button--md (default), button--xs, button--sm, button--lg, button--xl |
Primaire
[BUTTON](#){:.button.button--primary.button--pill}
<a class="button button--primary button--pill" href="">BUTTON</a>
Secondaire
[BUTTON](#){:.button.button--secondary.button--pill}
<a class="button button--secondary button--pill" href="">BUTTON</a>
Succès
[BUTTON](#){:.button.button--success.button--pill}
<a class="button button--success button--pill" href="">BUTTON</a>
Outline
[BUTTON](#){:.button.button--outline-success.button--pill}
<a class="button button--outline-success button--pill" href="">BUTTON</a>
Pill
[BUTTON](#){:.button.button--primary.button--pill}
<a class="button button--primary button--pill" href="">BUTTON</a>
Arrondi
[BUTTON](#){:.button.button--primary.button--rounded}
<a class="button button--primary button--rounded" href="">BUTTON</a>
Cercle
[X](#){:.button.button--primary.button--circle}
<a class="button button--primary button--circle" href="">X</a>
Extrêmement petit
[BUTTON](#){:.button.button--primary.button--rounded.button--xs}
<a class="button button--primary button--rounded button--xs" href="">BUTTON</a>
Petite taille
[BUTTON](#){:.button.button--primary.button--rounded.button--sm}
<a class="button button--primary button--rounded button--sm" href="">BUTTON</a>
Moyen
[BUTTON](#){:.button.button--primary.button--rounded}
<a class="button button--primary button--rounded" href="">BUTTON</a>
Large
[BUTTON](#){:.button.button--primary.button--rounded.button--lg}
<a class="button button--primary button--rounded button--lg" href="">BUTTON</a>
Extrêmement Large
[BUTTON](#){:.button.button--primary.button--rounded.button--xl}
<a class="button button--primary button--rounded button--xl" href="">BUTTON</a>
Images
Icônes
TeXt uses Font Awesome for icons, you can search available icon code snippet HERE.
<i class="fas fa-download"></i>
<a class="button button--success button--rounded button--lg" href="#"><i class="fas fa-download"></i> Download TeXt Theme</a>
| Type | Class Names |
|---|---|
| base | image |
| size | image--md (default), image--xs, image--sm, image--lg, image--xl |
Bordure

{:.border}
Ombre
{:.shadow}
Arrondi
{:.rounded}
Cercle
{:.circle}
Mélange
{:.border.rounded}
{:.circle.shadow}
{:.circle.border.shadow}
Exemples


Images largeur fixée (si hauteur ajouter height="36px")
Avec hauteur et largeur image {:height="36px" width="30px"}
{:width="300px"}
Extrêmement Petit
<img class="image image--xs" src=""/>
Petit
<img class="image image--sm" src=""/>
Moyen
<img class="image image--md" src=""/>
Large
<img class="image image--lg" src=""/>
Extrêmement Large
<img class="image image--xl" src=""/>
Elément
Contenu
Photograph
A photograph is an image created by light falling on a photosensitive surface, usually photographic film or an electronic image sensor, such as a CCD or a CMOS chip.
<div class="item">
  <div class="item__content">
    <div class="item__header">
      <h4>Photograph</h4>
    </div>
    <div class="item__description">
      <p>...</p>
    </div>
  </div>
</div>
Image et Contenu
Photograph
<div class="item">
  <div class="item__image">
    <img class="image" src=""/>
  </div>
  <div class="item__content">
    <div class="item__header">
      <h4>Photograph</h4>
    </div>
  </div>
</div>
Photograph
A photograph is an image created by light falling on a photosensitive surface, usually photographic film or an electronic image sensor, such as a CCD or a CMOS chip.
<div class="item">
  <div class="item__image">
    <img class="image" src=""/>
  </div>
  <div class="item__content">
    <div class="item__header">
      <h4>Photograph</h4>
    </div>
    <div class="item__description">
      <p>...</p>
    </div>
  </div>
</div>
Taille Image
Photograph
<div class="item">
  <div class="item__image">
    <img class="image image--xs" src=""/>
  </div>
  <div class="item__content">
    <div class="item__header">
      <h4>Photograph</h4>
    </div>
  </div>
</div>
Photograph
A photograph is an image created by light falling on a photosensitive surface, usually photographic film or an electronic image sensor, such as a CCD or a CMOS chip.
<div class="item">
  <div class="item__image">
    <img class="image image--sm" src=""/>
  </div>
  <div class="item__content">
    <div class="item__header">
      <h4>Photograph</h4>
    </div>
    <div class="item__description">
      <p>...</p>
    </div>
  </div>
</div>
Photograph
A photograph is an image created by light falling on a photosensitive surface, usually photographic film or an electronic image sensor, such as a CCD or a CMOS chip.
<div class="item">
  <div class="item__image">
    <img class="image image--lg" src=""/>
  </div>
  <div class="item__content">
    <div class="item__header">
      <h4>Photograph</h4>
    </div>
    <div class="item__description">
      <p>...</p>
    </div>
  </div>
</div>
Format Carte
Image
<div class="card">
  <div class="card__image">
    <img class="image" src=""/>
  </div>
</div>
Contenu
Photograph
A photograph is an image created by light falling on a photosensitive surface, usually photographic film or an electronic image sensor, such as a CCD or a CMOS chip.
<div class="card">
  <div class="card__content">
    <div class="card__header">
      <h4>Photograph</h4>
    </div>
    <p>...</p>
  </div>
</div>
Image et Contenu
Photograph
<div class="card">
  <div class="card__image">
    <img class="image" src=""/>
  </div>
  <div class="card__content">
    <div class="card__header">
      <h4>Photograph</h4>
    </div>
  </div>
</div>
Photograph
A photograph is an image created by light falling on a photosensitive surface, usually photographic film or an electronic image sensor, such as a CCD or a CMOS chip.
<div class="card">
  <div class="card__image">
    <img class="image" src=""/>
  </div>
  <div class="card__content">
    <div class="card__header">
      <h4>Photograph</h4>
    </div>
    <p>...</p>
  </div>
</div>
Image Overlay
<div class="card">
  <div class="card__image">
    <img class="image" src=""/>
    <div class="overlay">
      <p>Photograph</p>
    </div>
  </div>
</div>
<div class="card">
  <div class="card__image">
    <img class="image" src=""/>
    <div class="overlay overlay--bottom">
      <p>Photograph</p>
    </div>
  </div>
</div>
Flat
Photograph
<div class="card card--flat">
  <div class="card__image">
    <img class="image" src=""/>
  </div>
  <div class="card__content">
    <div class="card__header">
      <h4>Photograph</h4>
    </div>
  </div>
</div>
Image Clicquable
<a href="">
  <div class="card card--clickable">
    <div class="card__image">
      <img class="image" src=""/>
    </div>
  </div>
</a>
Class hero
Normal
Hero
<div class="hero" style="background-color: #ccc;">
  <div class="hero__content">
    <h3>Hero</h3>
  </div>
</div>
Centré
Hero
<div class="hero hero--center" style="background-color: #ccc;">
  <div class="hero__content">
    <h3>Hero</h3>
  </div>
</div>
Theme sombre
Hero
<div class="hero hero--dark" style="background-color: #123;">
  <div class="hero__content">
    <h3>Hero</h3>
  </div>
</div>
Image arrière plan
Hero
<div class="hero hero--dark" style='background-image: url("path-to-image");'>
  <div class="hero__content">
    <h3>Hero</h3>
  </div>
</div>
Hero
There's a hero, If you look inside your heart,
You don't have to be afraid of what you are.
<div class="hero hero--dark" style='background-image: url("path-to-image");'>
  <div class="hero__content">
    <h3>Hero</h3>
    <p>...</p>
  </div>
</div>
Hauteur
Hero
There's a hero, If you look inside your heart,
You don't have to be afraid of what you are.
<div class="hero hero--dark" style='height: 500px; background-image: url("path-to-image");'>
  <div class="hero__content">
    <h3>Hero</h3>
    <p>...</p>
  </div>
</div>
Image arrière plan Centrée
Hero
There's a hero, If you look inside your heart,
You don't have to be afraid of what you are.
<div class="hero hero--center hero--dark" style='background-image: url("path-to-image");'>
  <div class="hero__content">
    <h3>Hero</h3>
    <p>...</p>
  </div>
</div>
Hero
There's a hero, If you look inside your heart,
You don't have to be afraid of what you are.
<style>
  .hero-example--linear-gradient {
    background-image: linear-gradient(135deg, rgba(255, 69, 0, .5), rgba(255, 197, 0, .2)), url("path-to-image");
  }
</style>

<div class="hero hero--center hero--dark hero-example--linear-gradient">
  <div class="hero__content">
    <h3>Hero</h3>
    <p>...</p>
  </div>
</div>
swiper
Alpha
Normal
.swiper-demo {
  height: 220px;
}
<div class="swiper swiper-demo">
  <div class="swiper__wrapper">
    <div class="swiper__slide">1</div>
    <div class="swiper__slide">2</div>
    <div class="swiper__slide">3</div>
    <div class="swiper__slide">4</div>
    <div class="swiper__slide">5</div>
    <div class="swiper__slide">6</div>
    <div class="swiper__slide">7</div>
  </div>
  <div class="swiper__button swiper__button--prev fas fa-chevron-left"></div>
  <div class="swiper__button swiper__button--next fas fa-chevron-right"></div>
</div>
{%- include scripts/lib/swiper.js -%}
var SOURCES = window.TEXT_VARIABLES.sources;
window.Lazyload.js(SOURCES.jquery, function() {
  $('.swiper-demo').swiper();
});